


Once established in a home, bed bugs are difficult to remove. Treatments can be time, labor and material intensive to truly rid the home of all bed bugs present. The best offense is a strong defense. Prevent bed bugs from coming home in the first place.
 Tips to Prevent Bed Bugs from Coming Home
When you travel, keep these pointers in mind to reduce the risk of your bringing bed bugs home with you:
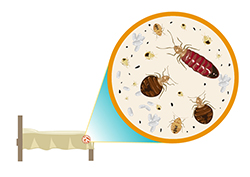
- When checking into a hotel, you can prevent bed bugs from coming home by first inspecting your room thoroughly for bed bugs. Look closely for them (or their signs: blood spots) in or behind the headboard of the bed, over the bed, in, on or behind the picture hanging above the bed board, in the seams of the mattress and box springs. (Bed bugs feed upon human blood at night and are somewhat messy leaving obvious stains behind.)
- Inspect the valet stand or luggage rack thoroughly around the fabric seams to see that there are no bed bugs; after passing your inspection, place your suitcase on the stand and keep it there the entire visit; do not let the suitcase sit on the floor, which makes it more difficult to prevent bed bugs from hitching a ride and coming home with you.
- Move your bed away from the wall of the room, and do not let linens touch the floor.
- Check the hangers and rack in the closet before hanging your clothes there. You want to prevent bed bugs from hitching a ride home on your cloths.
- Check nightstands and dresser drawers before placing personal items on or inside.
- If you should find bed bugs present, please alert the hotel management that this is the case and that you would like to be moved to another room. Only by informing the management of the bed bugs can they begin to tackle their problem. Hotels are now very concerned to prevent bed bugs. They’ll work with you to make your stay pleasant.
- When you return home, prevent bed bugs from entering your home by first unloading your suitcase in the garage or out on the porch or patio. Check your suitcase and other luggage thoroughly (inside and out) for any signs of bed bug hitchhikers that may have come with you.
- If you should accidentally bring bed bugs home with you, contact us immediately to help rid your home of them.


Recent Comments